Our Health Library information does not replace the advice of a doctor. Please be advised that this information is made available to assist our patients to learn more about their health. Our providers may not see and/or treat all topics found herein.
Office Ergonomics
Overview
What is ergonomics?
Ergonomics (say "er-guh-NOM-iks") is the study of the kind of work you do, the environment you work in, and the tools you use to do your job. The goal of office ergonomics is to set up your office work space so that it fits you and the job you are doing.
It focuses on how things are set up in your office work space, such as:
- Your workstation setup, how you sit, and how long you stay in one position.
- How you do a certain task, the kinds of movements you make, and whether you make the same movements over and over.
- Your work area, including light, noise, and temperature.
- The tools you use to do your job and whether they are set up to fit your needs.
Why should your work area be ergonomic?
Office ergonomics can help you be more comfortable at work. It can help lower stress and injury caused by awkward positions and repetitive tasks.
It's common for injury and illness to happen at work. Both can cost you and your employer time and money. They can also affect how well you do your job. Injuries can cause stress and strain on your muscles, nerves, tendons, joints, blood vessels, and spine.
You could also be at risk for problems such as tendinopathy and bursitis. These are caused by overuse and repetitive movements. Over time, these kinds of movements can make you feel bad. They can cause long-term health problems. And they use up your sick time.
By applying ergonomic solutions, you may be able to reduce physical problems and improve your comfort and ability to work effectively.
When your workstation is set up right, you may:
- Be less likely to have problems such as headaches or eyestrain.
- Reduce neck and back pain.
- Prevent bursitis or tendon problems that are linked to doing the same task over and over (repetitive tasks).
How can you prevent injuries at work?
Here are a few ways you can prevent injuries at work.
- Try to place your work in front of you.
- Sit tall while you work.
- Try not to put too much stress on one area of your body, such as your lower back or arms.
- Change your position often.
- Turn with your whole body instead of twisting to face your work.
- Take breaks to stretch or get out of your chair every 20 to 40 minutes.
If you can, switch to another task.
- Maintain good health.
Good general health, including strength and flexibility, can help prevent injuries. It will also help you recover faster if you are injured.
- Get regular exercise.
- Eat healthy.
- Do not smoke.
- Follow prescribed treatment for any other health conditions you have.
Common Office Injuries
Musculoskeletal problems
Musculoskeletal problems are common in the workplace. Your musculoskeletal system is made up of the structures that support you and help you move, such as bones, joints, muscles, tendons, and ligaments. Examples of musculoskeletal problems that may be related to ergonomic issues are:
- Bursitis.
- Carpal tunnel syndrome.
- Muscle strains, often affecting the neck, upper back, lower back, and shoulders.
- Tendon injury.
Symptoms can include pain in your:
- Back.
- Hand, wrist, or arms.
- Neck and shoulders.
What you can do
Good posture at work can help prevent musculoskeletal injuries.
- Stand tall.
Keep the natural curves in your back. Slouching increases stress on your back and can also make you feel less energetic.
- If you stand for long periods, change your position periodically.
Try putting one foot up on a low stool.
- Bring reading material up to you.
Try to not lean over a low desk.
- Use good sitting posture.
Relax your shoulders, keep your feet flat on the floor, and avoid leaning close to tasks on your desk.
- Turn your whole body to your task instead of twisting.
Here are some ways you can help prevent falls at work.
- Keep walkways clear of cords, clutter, and spills.
- Close drawers completely after you use them.
- Use stepladders instead of chairs to reach high objects.
- Report any hazards such as loose carpeting or burned-out lights.
- Wear shoes appropriate to your job and environment.
Vision problems
Vision-related problems are common in the workplace.
Typical problems include:
- Eye problems from either too little or too much lighting. Poor lighting can lead to:
- Eyestrain and irritation.
- Watery eyes and red, swollen eyelids.
- Double vision.
- Decrease in the ability to focus the eyes and see clearly.
- Headaches from straining to see clearly.
- Neck and back pains due to hunching over to see small items.
- Accidents due to poor lighting, glare, shadows from lighting, or moving from a well-lighted area to a dark area.
What you can do
You can reduce your risk of vision problems from improper lighting with:
- Full-spectrum lights, which may help reduce eyestrain.
- Task lighting (such as lights above your workstation or on your desk). This can increase the level of light in your office and allow you the flexibility to position the light where it is needed most.
- Monitor screens that reduce glare, such as plasma screens or removable glare guards.
- Proper placement of computer screens. Do not place a computer screen in front of or next to a window. This creates a contrast problem and visual stress. If you do sit next to a window, the best placement for your monitor is at a right (90-degree) angle to the window.
- Window blinds or tinted glass, to reduce sun glare while still allowing filtered light into your office.
It's also a good idea to have an eye exam every 1 or 2 years. If you wear bifocals or reading glasses, you may want to adjust your monitor so that you don't have to tilt your head back to see clearly. Or consider full-frame reading glasses for computer use. There are also progressive lenses available that have a reading prescription at the bottom, a mid-distance prescription that is good for computer use in the middle of the lens, and a long-distance prescription at the top of the lens. The lens has these three types of prescriptions in different areas of the glass and smooth transitions between types of prescriptions.
Noise problems
Hearing problems are common in the workplace.
Noise can produce tension and stress and interfere with your ability to concentrate. And it can damage your hearing.
- Common office noise sources may include:
- Equipment, including telephones, computers, and printers.
- Many people working close together, which leads to more voices and foot traffic around work areas.
- Noise outside the building that comes through office windows.
- Even low-level noise can reduce your productivity and increase stress levels, leading to problems with muscles and joints.
- High-level noise is regulated by the U.S. Occupational Safety and Health Administration (OSHA), as this type of noise can lead to significant hearing loss.
What you can do
You and your company can reduce your risk for hearing loss or other problems associated with noise levels with:
- Earplugs, to reduce background noise.
- Acoustic ceiling tiles, to absorb some noise.
- Relocation of noisy equipment.
- Window glass, to block out excessive noise.
- Carpets, to help absorb foot-traffic and conversational noise.
- Noise-reducing partitions, to reduce noise around workstations.
Using Ergonomics to Prevent Injury
Ergonomics may prevent musculoskeletal injuries (such as back strain or carpal tunnel syndrome) by reducing physical and mental stress caused by the workstation setup. By focusing on the physical setup of your workstation and the tools you use, you can reduce your chances of injuries. It also is important to evaluate the work process, including job organization, worker rotation, task variety, and demands for speed and quality.
Here are some ways to use your workstation properly.
- Arrange your work to reduce stress on your body.
Try to sit or stand comfortably in a position that does not put stress on any specific area of your body. You should be able to keep your neck in a neutral position and minimize the need to look up or to the sides continuously while you are working.
- Try to not move from your waist.
Keep the workstation and workstation tools within reach without having to lean, bend, or twist at the waist frequently.
- Vary postures if possible.
- Take 10- to 15-second breaks frequently throughout your task.
For example, look away from your computer monitor, stand up, or stretch your arms. Short breaks reduce eyestrain and buildup of muscle tension.
- Take regular breaks.
Try taking 3- to 5-minute breaks—or changing tasks—every 20 to 40 minutes. Working intensely over long periods of time without taking breaks can greatly increase your risk for musculoskeletal injuries. Taking breaks and stretching may reduce the risk of repetitive motion injuries.
- Do stretching exercises during your breaks.
Stretch your body by getting up out of your chair and stretching your arms, shoulders, back, and legs. When you are sitting, shrug and relax your shoulders.
If you do similar work or activities at home, be sure to apply these principles there as well to avoid the cumulative effect of repetitive motions.
Setting up an ergonomic workstation
When you set up an ergonomic workstation, choose workstation tools that fit your personal physical and comfort needs, such as:
- A desk or work surface that is:
- Large enough to accommodate papers, reference manuals, and other workstation tools, but arranged properly to access items easily. Arrange your desk so the items you need most often are within reach, and you don't have to bend or twist frequently.
- At a height that allows enough space for your knees and thighs to comfortably fit under the desk.
- Not shiny to reduce glare.
- A computer monitor that is:
- Directly in front of you.
- Clear and easy for you to see without leaning forward or looking up or to one side.
- At a height where the top of the screen is at eye level or within 15 degrees below eye level.
- Less than an arm's length away from you.
- Protective against eyestrain, which may lead to vision problems and headaches. For example, glare guards are available either as part of the monitor or to be placed over the monitor screen. Plasma screens also have less glare than other monitors.
- A chair that maintains normal spinal curvature. A supportive chair:
- Is adjustable, so that you can set the height to rest your feet flat on the floor. When you sit in your chair, your feet should rest flat on the floor, and your thighs should be parallel to the floor. Keep your feet supported on the floor or on a footrest to reduce pressure on your lower back. Some people like to sit in a slightly reclined position because it puts less stress on the back, although this may increase stress on the shoulders and neck when you reach for items.
- Has an adjustable back so it supports your lower back. Lumbar support for your back is helpful.
- Has adjustable armrests that allow your elbows to stay close to your sides. If you have arm rests, you should be able to use them without slouching or having your shoulders either hunched up or drooping down. Try to adjust the armrests so your forearms are parallel to the floor and your wrists are neutral. A neutral position means not bent too far forward or backward. If you are not comfortable with armrests, move them out of your way. It is still important to keep your arms close to your sides even if you choose not to use armrests.
- Has a breathable, padded seat. The edge of the chair should be soft and should not touch the backs of your knees.
- Rolls on five wheels for easy movement without tipping.
- Lets your feet rest comfortably flat on the floor. If your feet don't rest like this, a footrest can help support your legs and reduce low back strain.
- A computer keyboard and keyboard tray that allow comfortable typing or keying.
- Your keyboard tray should be big enough to hold your keyboard and mouse, and the height should be adjustable.
- Your keyboard should be at a height that allows your elbows to be bent about 90 degrees and close to your sides.
- There are many variations for keyboard design, including split, curved, or rotated keyboards. Studies have not proved that these reduce injuries. But some people find them to be more comfortable. If you notice hand, arm, or neck discomfort, your employer may have different keyboard styles for you to try. Different people find different styles work best for them.
- Many keyboards and keyboard trays have wrist pads (also called wrist supports or wrist rests) that help support the arms and reduce strain during breaks from typing. The pads are not intended to be used while you are typing. But some people find the pads helpful even when they are using their keyboard or mouse. When you type or use your mouse, try raising your forearms a little so your wrists are in a neutral position and your arms and hands can move freely. You may want to alternate between resting your wrists on the supports and raising them up. If you use a wrist pad, it's best to rest your palm or the heel of your hand on the support, rather than your wrist.
- You can adjust the tilt of the keyboard. Some people find it more comfortable if the keyboard is flat or tilted slightly down at the top. Try different tilt angles to see what is most comfortable for you.
- The computer mouse should be placed close to the keyboard where it does not cause you to lean forward or to reach too far.
- A computer mouse or pointing device that does not require a lot of forearm movement or force, such as a trackball mouse or touch pad, is more comfortable than a standard mouse for some people. A trackball or touch pad may help reduce symptoms that some people get from the repetitive motions of a standard computer mouse. Other types of pointing devices are also available. The best position for mouse and trackball use is with your wrist neutral.
- A document holder that holds your papers level with your computer monitor, so that as you look back and forth between paper and monitor, your eyes do not need to continually refocus.
- A comfortable room temperature, a relatively quiet area, and sufficient lighting without glare from office lights, sunlight, or the computer screen.
- A telephone headset or speaker phone, so you avoid awkward positions while talking and doing other tasks, such as typing.
- A location for any reference manuals that is close to the center of your workstation, for easy access.
Avoiding injury when you use a laptop
Many people use laptop computers as secondary workstations. If you use a laptop often, try the following ways to improve your ergonomic workstation.
- Do not use a laptop as your primary computer.
Using a docking station that provides an adjustable keyboard can help keep your wrists in a neutral position to reduce stress and strain.
- Take 10- to 15-second breaks often throughout your task.
For example, look away from your computer monitor, stand up, or stretch your arms. Short breaks reduce eyestrain and the buildup of muscle tension.
- Keep your head and neck in a neutral position.
Also keep your head about 18 in. (46 cm) to 30 in. (76 cm) away from the monitor screen.
- Adjust your workstation so that your wrists are relatively straight and your fingers are slightly curved.
Position the keyboard so that it is at elbow height. You may need to use a pillow under your elbows to support your arms if you are sitting on a couch or chair while keying.
- Use an external mouse.
Use this instead of the small touch pad or trackball that is on the laptop keyboard.
- Be safe when you have to carry your laptop with you.
- Carry only what you need with you.
- Use a carrying case with a padded strap and handle. Backpacks with two straps are the best. If you use a case with one strap, it's best to put the strap over the opposite shoulder to help distribute the load you are carrying, or to switch hands regularly.
- Use a luggage cart with wheels when possible.
Making an ergonomic workstation for your child
You can help make an ergonomic workstation for your child by following these tips.
- Make sure the seat is high enough.
Your child should be able to see the monitor without looking up. Your child's shoulders should be relaxed when typing. You may want to have your child sit on a thick book, a firm pillow, or a booster seat.
- Make sure your child's feet are supported.
Use a footstool (or a thick book or a backpack) to support your child's feet if they don't rest comfortably on the floor.
- Make sure your child sits towards the front of the chair.
If needed, use a firm pillow behind your child's back to scoot your child toward the front of the chair.
- Adjust tools to keep your child's wrists straight.
You may need to adjust the keyboard and mouse or other input device.
- Avoid glare on the monitor screen.
Learn more
Self-Care
Home treatment can help relieve discomfort caused by stress and overuse. You can try home treatment for a few days when you first notice symptoms.
- Rest the painful area and avoid activities that make your pain worse.
- Use ice to reduce pain and swelling. You can try heat, or alternating heat and ice, after about 3 days or when there is no swelling.
- Ask your doctor if you can take an over-the-counter pain medicine, such as acetaminophen (Tylenol), ibuprofen (Advil, Motrin), or naproxen (Aleve). Be safe with medicines. Read and follow all instructions on the label.
- Use good posture. Slumping or slouching after a strain or injury in your back can make pain worse.
To help prevent another injury, review your work area. Make sure it fits you and the job you are doing. You may be able to get more information about workplace safety and ergonomics from your human resources department or your state's Department of Labor.
Stretches to ease wrist and arm aches
Wrist extensor stretch
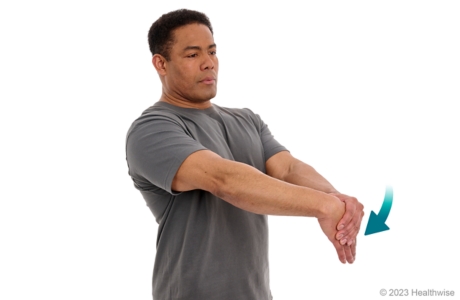
- Extend the arm with the affected wrist in front of you and point your fingers toward the floor.
- With your other hand, gently bend your wrist farther until you feel a mild to moderate stretch in your forearm.
- Hold the stretch for at least 15 to 30 seconds.
- Repeat 2 to 4 times.
- It's a good idea to repeat these steps with your other wrist.
Wrist flexor stretch
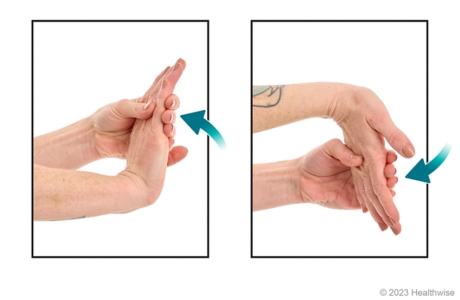
- Extend your affected arm in front of you with your palm facing down.
- Bend back your wrist on your affected arm, pointing your fingers up.
- With your other hand, gently bend your wrist farther until you feel a mild to medium stretch in your forearm.
- Hold for at least 15 to 30 seconds.
- Repeat 2 to 4 times.
- Repeat steps 1 through 5. But this time extend your affected arm in front of you with your palm facing up. Then bend back your wrist, pointing your fingers down.
- It's a good idea to repeat these steps with your other arm.
Stretches to ease shoulder aches
Anterior shoulder stretch (in doorway)
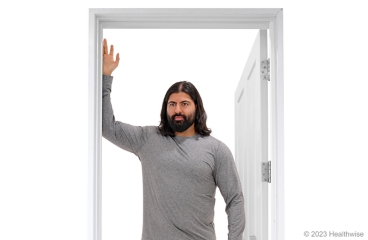
- Stand in a doorway and place one forearm against the door frame. Your elbow should be bent and a little higher than your shoulder.
- Relax your shoulder as you lean forward, allowing your chest and shoulder muscles to stretch. You can also turn your body slightly away from your arm to stretch the muscles even more.
- Hold for 15 to 30 seconds.
- Repeat 2 to 4 times.
- Repeat these steps with your other arm.
Chest expansion
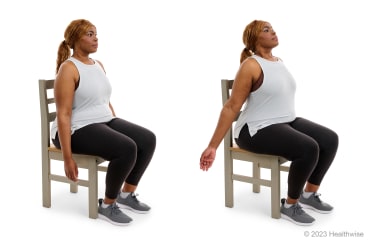
- Sit or stand up straight with your feet shoulder-width apart.
- Look straight ahead, and do not allow your head to tilt back. As you take a deep breath, open your arms out to the sides and roll your arms back. Your palms will turn outward, and you will feel a stretch across your chest.
- Hold this stretch for 15 to 30 seconds. Keep breathing normally and don't hold your breath.
- Slowly lower your arms to your sides and let your palms turn back toward your legs.
- Repeat 2 to 4 times.
Overhead stretch
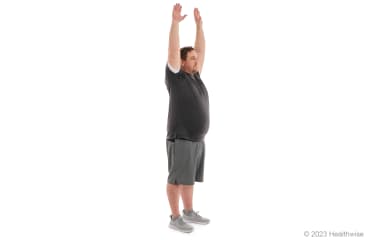
- Stand up straight with your feet shoulder-width apart. Or sit up straight in a chair.
- Looking straight ahead, raise both arms over your head. Reach up and back with your arms until you feel a stretch in your shoulders. Do not allow your head to tilt back.
- Hold for 15 to 30 seconds, then lower your arms to your sides.
- Repeat 2 to 4 times.
Stretches to ease backaches
Overhead stretch

- Stand up straight with your feet shoulder-width apart. Or sit up straight in a chair.
- Looking straight ahead, raise both arms over your head. Reach up and back with your arms until you feel a stretch in your shoulders. Do not allow your head to tilt back.
- Hold for 15 to 30 seconds, then lower your arms to your sides.
- Repeat 2 to 4 times.
Side stretch
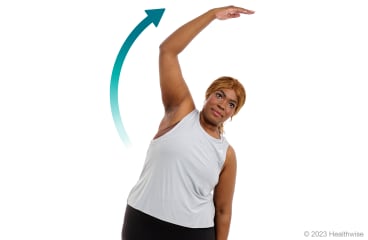
- Sit or stand up straight. If you're standing, keep your feet about hip-width apart.
- Raise one arm over your head, and then lean to the other side.
- Slide your hand down your leg as you let the weight of your raised arm gently stretch your side muscles. If you're sitting, keep your buttocks flat on the chair.
- Hold for 15 to 30 seconds. Then switch sides.
- Repeat 2 to 4 times on each side.
Press-up back extension
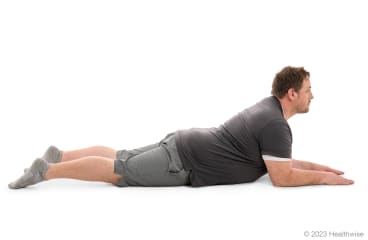
- Lie on your stomach, supporting your body with your forearms. Keep your elbows below your shoulders.
- Press your elbows down into the floor to raise your upper back. As you do this, relax your stomach muscles and allow your back to arch without using your back muscles. Don't let your hips or pelvis come off the floor.
- Hold for 15 to 30 seconds, then relax.
- Repeat 2 to 4 times.
Supported rest
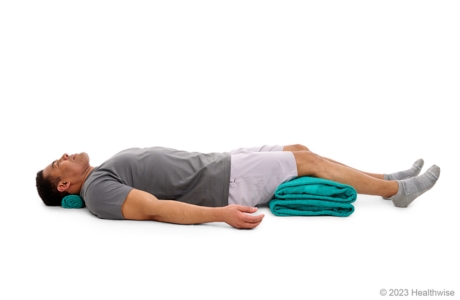
- Lie on your back with a rolled towel under your neck. Support your knees with something, such as pillows or folded towels or blankets. Extend your arms comfortably to your sides.
- Relax and breathe normally.
- Remain in this position for about 10 minutes.
- If you can, do this 2 or 3 times each day.
Learn more
Where to Go for Help
If you have tried home treatment, such as rest, but your pain and discomfort have lasted for several days (for example, 7 continuous days), call your doctor. Health professionals who can diagnose and treat work-related injuries include:
You may be able to get help or information through:
- Your human resources department at work.
- Your state's Labor Department.
- Occupational Safety and Health Administration (OSHA), for information on treating and preventing injury.
- National Institute for Occupational Health and Safety (NIOSH), a division of the Centers for Disease Control and Prevention (CDC). NIOSH is the federal agency responsible for conducting research and making recommendations for the prevention of work-related disease and injury.
Related Information
Credits
Current as of: July 31, 2024
Author: Ignite Healthwise, LLC Staff
Clinical Review Board
All Healthwise education is reviewed by a team that includes physicians, nurses, advanced practitioners, registered dieticians, and other healthcare professionals.
Current as of: July 31, 2024
Author: Ignite Healthwise, LLC Staff
Clinical Review Board
All Healthwise education is reviewed by a team that includes physicians, nurses, advanced practitioners, registered dieticians, and other healthcare professionals.
This information does not replace the advice of a doctor. Ignite Healthwise, LLC disclaims any warranty or liability for your use of this information. Your use of this information means that you agree to the Terms of Use and Privacy Policy. Learn how we develop our content.
To learn more about Ignite Healthwise, LLC, visit webmdignite.com.
© 2024 Ignite Healthwise, LLC. Healthwise, Healthwise for every health decision, and the Healthwise logo are trademarks of Ignite Healthwise, LLC.


